

Verify your global import settings
Go to Dashboard->Vehicles->Settings
Click on the Import Inventory Tab
Make Sure you’ve activated your license so you’ll receive updates
Walk through the ‘Global Settings’ section
Global Image Options
Check the box next to the image sizes you DO NOT want to be created for each photo imported.
For maximum import speed you should check all sizes you do not plan to use when displaying vehicles.
Image Importing Options
The WPSD Import Inventory PlugIn can use 2 different methods for importing photos.
If you have issues importing photos then try toggling this option
If you continue to have issues then contact your web host and ensure either file_get_content() or curl() are available.
Main Images
If you check this option then WPSuperDealer will no longer use the featured image as it’s main photo, but will instead use the first image link saved.
This option is useful if you ARE NOT importing images into your WordPress install and are instead only importing the links to the images located on the third party server.
Manage Imports
This section provides quick access to creating or managing your imports.
You can also create and manage imports by visiting Dashboard->Vehicles->Imports
Import Utilities
NOTE: These utilities are very powerful and may cause issues if not used correctly. Please use them with caution.
Download File
Use this utility to download a file to your uploads folder.
This is useful if your feed provider requests that you retrieve the file directly from their server.
If possible try to avoid this. Most feed providers are more than happy to FTP or sFTP directly into your server to provide your feed file directly. Only use this option if your provider does not have the ability to directly send you the file.
Unzip File
Use this utility to schedule unzipping a file
This is useful if your feed provider sends you one or more feed files all zipped up
Bulk Delete Vehicles
Danger Will Robinson! – this option kills vehicle inventory in batches and they CAN NOT be recovered once removed this way.
If you enter a small number, like 10, then check the box and click the remove button it will delete 10 vehicles, wait a few seconds and then delete 10 more. It will keep doing that until you either refresh the page or all vehicles have been removed.
Setting up your first import
Title
Give your import a descriptive name – it has been our experience that using a name that indicates who the feed provider is can help clarify things if you change feed providers in the future.
Select File
Enter the path on your server where the file you want to import is located. If you’re scheduling your imports then it’s important to make sure this file is updated each night.
Alternatively you can choose to manually upload a file to import.
You can also enter a URL that points to a file, but this method can be very slow and is not recommended if it can be avoided.
File Options
The first option lets you select the character your file is delimited by. In most cases this will be a comma, but we’ve included several other options if needed.
If you do not know how your file is delimited then please ask your feed provider.
The second option lets you select what character is used to delimit sub items in your feed. For example, you might have a column for images and that list of images is separated by a pipe | character.
If you do not know how your sub items are delimited then please ask your feed provider.
The next option lets you tell the import if the first line of the file contains column headers and should be skipped.
If you do not know if you file has a header row then please ask your feed provider.
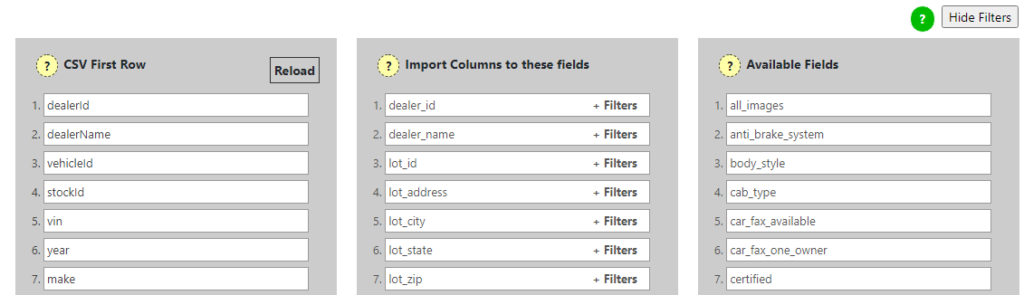
Next you will see a button that says “Edit Import Map”
After clicking it a new section will slide open that allows you to map you file to your vehicle fields
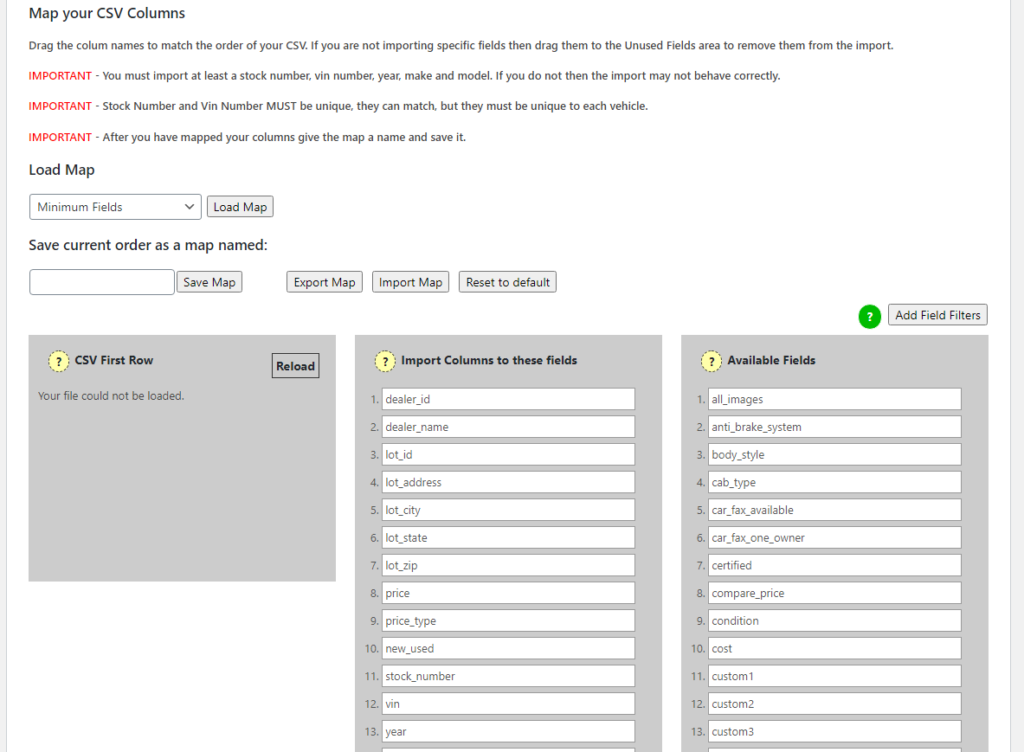
If the first column says “Your file could not be located” then please try saving your import. If the message remains then please verify your file is located at the path you entered in the first section.
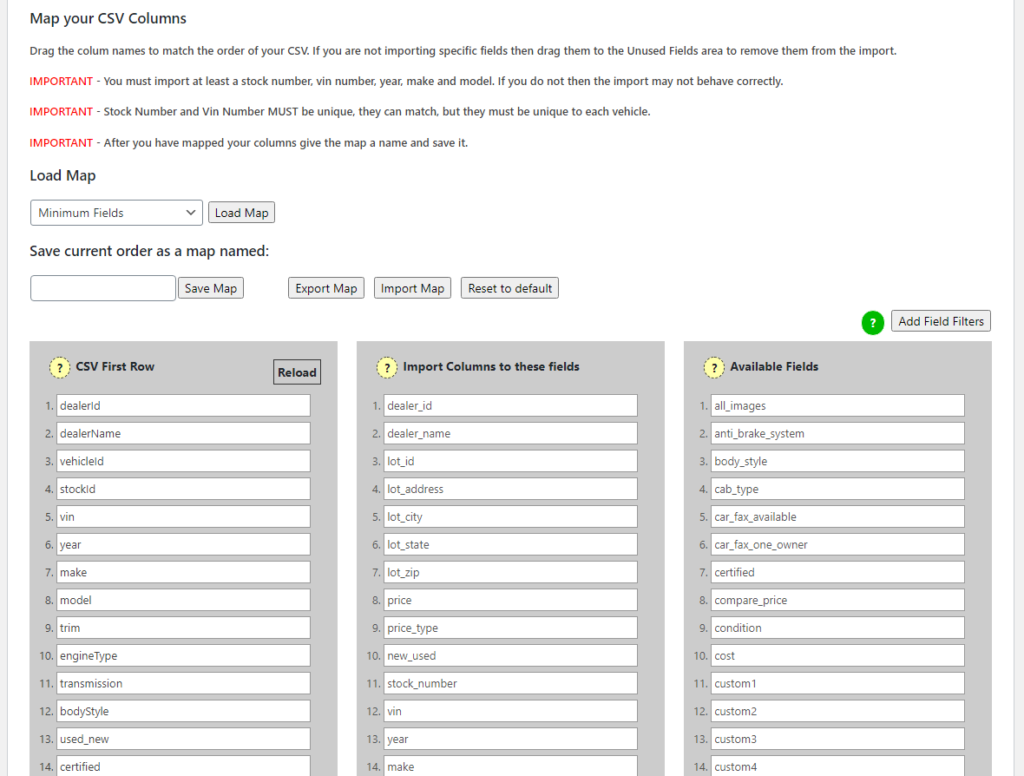
You need to match up the fields in the second column to the fields from your file, which can be seen in the first column.
The third column contains all of the available fields not being imported.
Drag fields from the third column to the second column and match them to the row from the first column that has the data you want imported.
If you do not need a field in the second column then drag it over to the third column.
Advanced field options
There may be cases where you want to change certain data as it’s being imported.
Above the third column you will see a button that says “Add Field filters”
Clicking one of these links will open a form for that field where you can manipulate the information as it is imported
Let’s consider the body style field. You could enter ‘Truck’ in the first field and ‘Pickup’ in the second and when the import runs it will import ‘Pickup’ into the body style field for any vehicle that has ‘Truck’ in the feed.

After editing your map you might want to save the map itself. This can make it easier to apply the same map to another file or to create a new import from scratch

Custom Vehicle Location
The next section allows you to manually force a location name onto all vehicles in an import. You may wish to do this if your import doesn’t contain location information or to force vehicles from different feeds to all flow into the same location.
Import Filter
This section lets you filter vehicles by one of the common fields available.
If populated then only vehicles that match the filter will be imported
Photo Options
Do you want to import all photos?
If this is left unchecked then all gallery photos will be linked from their current location instead of imported to your site.
Do not import main photos/featured images
If this is checked ALL photos will be linked from their current location instead of imported to your site.
Your main photos/featured images will not be imported.
This option will not work if you have selected to import all photos.
Remove photos/featured images from vehicles not in the current import
If this is checked then all gallery photos will be removed from vehicles that were added previously by this import and not in the current file.
If you have a large inventory then this option may timeout if you do not have enough system resources available.
Update Options
This section controls what happens when a vehicle already exists
Do you want to update all fields when existing records are found?
Updating all fields can slow down your import and potentially cause timeouts.
This option will update prices, description, all option fields and the main photo.
Gallery images will only update if you are linking to them rather than importing them.
Mark vehicles not on this list as sold.
If this is checked then any vehicle not in this list will be marked sold.
Unpublish vehicles not in this import.
If this is checked then any vehicle not in this list will be unpublished.
Run your import in batches of ???
If you leave this field blank or set it to 0 then it will attempt to import all lines in your file.
If you enter a number, for example 100, then when you schedule the import it will split up into batches of 100.
Email Report
If populated then a simple report will be sent to this address when the import completes
Schedule Import
This section allows you to schedule a time each day to run the import
We suggest picking a time 1-2 hours after your feed file should be delivered – it has been our experience that some feed providers can be delayed on occasion, so it is best to give them plenty of time before running your import.
The last section allows you to manually import your file or a portion of it.
This option can be used to import thousands of vehicles, even on a low powered server
The key is to set your batch number low and then leave your browser open while it slowly imports your vehicles.
Now you know how to setup your imports.
Key things to keep in mind:
BONUS